The Tape Drive Repair Tutorial
Why and how
The 9845 can be justifiably called the mimosa of the vintage computer systems, since they are complex and there's pretty much that can fail. But if you scan the frequency of the numerous problems with the 9845, the tape thing seems to be the most attractive one. Understandable, since the tape drives are the standard built-in mass storage. Actually at the time the 9845 was designed, it was unusual to build the mass storage off-the-shelf in a desktop system. The tape system was comparably cheap, fast and reliable. Even with a standard system it was possible to reach persistance over power-off and power-on cylcles, and it was a handy distribution medium for software.
The same applies today. Every 9845 has a tape system built in, and it would be the natural way to save and exchange your programs if not...
Well, think of this scenario: You happily acquired a 9845 system. You power up and it works. And there's even some software on tape included. You plug the tape cartridge in, issue some commands and the tape drive begins to spin. Suddenly, there is a strange noise, the tape is not moving any more, but you hear something spinning. In a short moment of panic you press CONTROL-STOP. You open the tape drive door, and what you see is a tape spoiled with a strange black material. You inspect the world behind the tape drive door, and everything looks the same. Sticky black substance everywhere. Oops.
The story behind is simply that HP used a kind of rubber coating for the tape capstan, which literally melted after years. This is the same for all tape drives, those in HP terminals, those in the peripheral tape drives, those in the 9825, those in the Series 80 and those in the 9845.
Be warned that this is by far not the only problem with those tape drives. From my personal point of view, the tape drives make most of the problems in the whole system, however the system works well without them, so the problems are not as severe as the ROM decline, for instance. The capstan problem probably is the most common defect, but others will be covered here as well.
Please keep in mind that the tape drive, unless you are using newly manufactured suitable DC100 tape media, is not a reliable storage medium. The drives should essentially be used to read old tapes for an immediate backup on other media like floppy disk or via HPDrive. Even this will be hard work for tapes which have already lost part of their content over the years. Don't rely on the internal tape drives for your own program or data storage. By the way, a known good tape is extremely valuable for all kind of diagnostics (since you can determine without doubt that if there is a problem, it is in the tape drive). Experience shows that DC100 tapes from 3M have a much more durable magnetic coating than the tapes manufactured by HP. If you see one of those, maybe unused and original shrink-wrapped - get it. DC100 tapes are a special science. Look into the Saving Tapes Tutorial to learn more about them.
Capstan Repair
There are several suggestions in the Web how to revive the capstan. Here's another procedure how it can be done. I think it is the best way I heard about, but you have to decide by your own.
The key for capstan repair is to find a suitable substitute for the melted rubber. Consistancy, size, grip and durability have to be comparable to the original material. Some suggest heat shrink tubes, however there are reports that the material wears out during use. I tried a couple of alternatives, finally I got the best results with the kind of vinyl which is used as coating for tools, crocodile clips etc. It is slip-proof, has the right viscosity, and is easy to acquire.
What you need:
- A Pozidriv skrewdriver
- A cutter knife
- The substitute vinyl tube for the capstan coating. It should have the right inner diameter (ca. 8 mm) and thickness (0.5 mm). It is important that you need some force to get the tube over the capstan, because the tube will widen a little bit during operation but shall still fit tight. Color doesn't matter. Red and yellow look cool but black is closer to the original (I took it from a couple of insulated crocodile clips).
- Some superglue
- Isopropyl alcohol
- Magnetic head cleaner
- Q-tips
This is the procedure:
- Remove the mainframe top cover (as described in chapter 3 of the 9845 Service Manual which can be downloaded from hpmuseum.net).
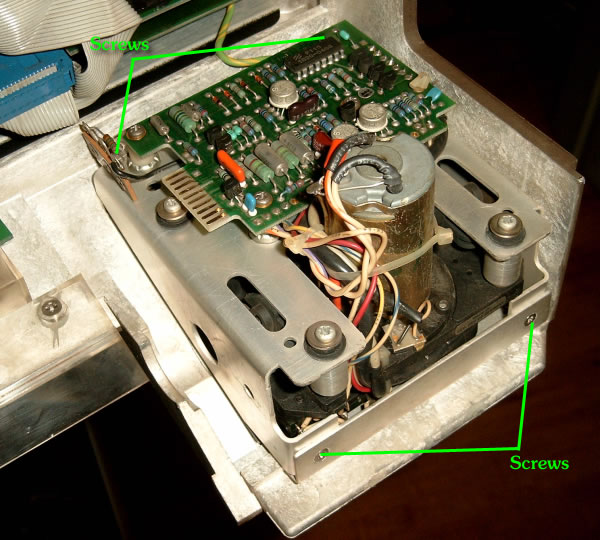
- Remove the four screws which attach the tape drive to the chassis as it is describes in chapter 3 of the 9845 Service Manual. Disconnect the ribbon cable (just to be sure: note polarity and orientation) and detach the complete tape drive (see photo below).
- Clean the drive and especially the capstan from any residual rubber. Use the isopropyl alcohol for assistance. Be a little bit careful not to make deep scratches into the capstan. When finished, the capstan should show just the pure metal.
- Tailor the vinyl tube to the right size. Cut the tube to a length of aprox. 1 cm. Try fitting the tube over the capstan, it should be very tight and overlap at least 2 mm on the upper and the lower side of the capstan. Then remove the tube.
- Now there is the only demanding part: Fixate the tube with the superglue on the capstan. It should fit evenly with overlaps to the top and the bottom edges. Press the tube on the capstan until the superglue is dry. The smoother the surface, the smoother the tape will run.
- Use the cutter knife to cut the overlapping vinyl off with exact alignment to the upper and lower edge of the capstan. Then try turning the capstan. The vinyl must not contact anything else but the capstan, so that the capstan can rotate freely. Also check that the vinyl is tight on the capstan and nothing is loose.
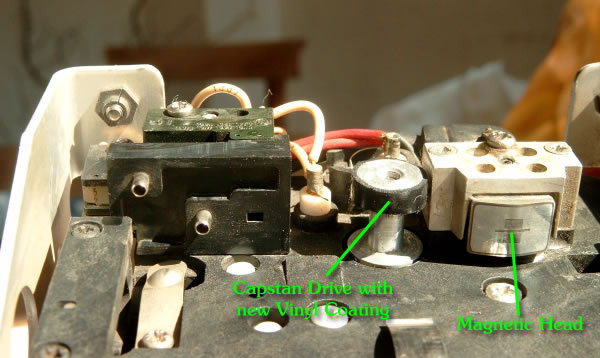
- Take the chance and clean the read/write head with the magnetic head cleaner and the Q-tip, then clean the edge connectors where the ribbon cable was connected (both ends) with isopropyl alcohol.
- Re-attach the drive assembly to the chassis, fasten the four screws and reconnect the ribbon cable.
- Re-install the top cover. Now the tape drive is ready for use (well, at least the capstan problem should be fixed).
Also see this site for an alternative technique:
- http://www.voidware.com/calcs/hp85rep.htm (actually targeted at the Series 80, however the problem is the same)
Dirty Read/Write Head
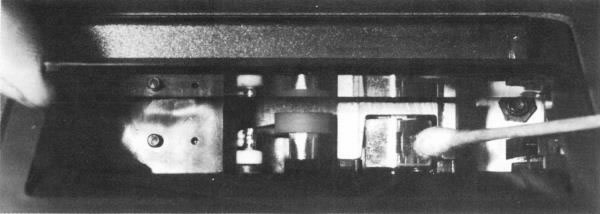
If you got a lot of intermittant failures during tape use (esp. error 87) there is a ligitimate suspicion that the read/write head needs some cleaning. You can do that without disassembling the whole system. Just fill a Q-tip with magnetic head cleaner and rub the read/write head through the open tape drive door.
Two or three applications should be enough. Wait until the fluid is completly vanished, then try with a known good tape.
Light Bulb Repair
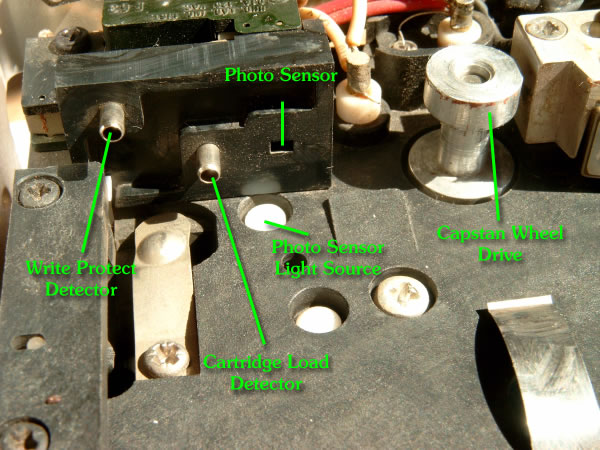
The next problem which is quite common are defect light bulbs. Two of those are used as light source for photo sensors which detect the end-of-tape marker and the rotation of the capstan. The first one is visible when looking through the tape drive door and should permanently be lit when the system is powered on. If it is defective, every tape will spool off. The other bulb is a little bit hidden below the capstan. If this one is defective, you will just get an error.

Replacement Bulb
What you need:
- A Pozidriv screwdriver
- Replacement bulbs. The light bulbs are standard 3V bulbs with a diameter of aprox. 2 mm and should be easy to acquire.
- A nipper to cut the wires
- A soldering iron & some electronic solder
The procedure is very straight-forward:
- Remove the top cover and de-attach the tape drive assembly as described in the previous section.
- Locate the defective bulb. The light source for the tachometer is easily accessed (it is positioned immediately behind the capstan), whereas getting access to the bulb for end-of-tape detection requires to de-attach the small PCB.
- Cut the old bulbs wires, remove the old bulb, set in the new bulb and solder its wires to the remaining wires of the old bulb.
- Re-attach the tape drive assembly, test the new bulb(s) for proper function, and then re-install the top cover.
Other Tape Drive Problems
There are of course a lot of other problems which cause the tape drives to fail. Examples are magnetized or worn read/write heads, electrical contact problems or broken cables. The signal paths of the tape drives go over several PCBs, so the chance for an interconnect problem is right high. However, I'll address those problems anytime in the future.
QIC 40/80 Tape Drive Mod
There is an interesting mod by Rik Bos, who managed to change his once original DC100 cartridge tape drive to work with more recent QIC 40/80 tapes. Those QIC 40/80 tapes are ¼" tapes and as such are a bit broader then the 0.15" of the DC100 tapes. As you can see at the photograph below, DC100 and QIC 40/80 cartridges have the same footprint, however differ in their height:

DC100 and QIC 40/80 Cartridge Comparison
Consequently, the drive wheel is positioned a bit different, so that the tape drive's capstan won't reach to it. However, by modifying the capstan, you in principle can use an existing cartridge tape drive to mechanically support QIC 40/80 tapes, which are much more reliable and much easier to acquire. Of course it is not possible to read or write QIC 40/80 tapes for data interchange with genuine QIC 40/80 drives with this mod.
Rik suggests to first equalize the capstan drive wheel to the capstan axis on a lathe:
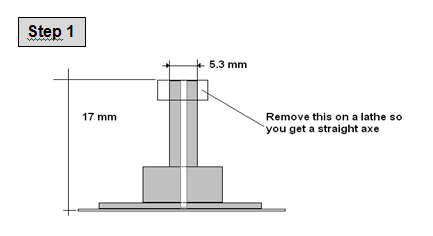
Step 1: Remove Drive Wheel (Courtesy Rik Bos)
Then add a modified drive wheel:
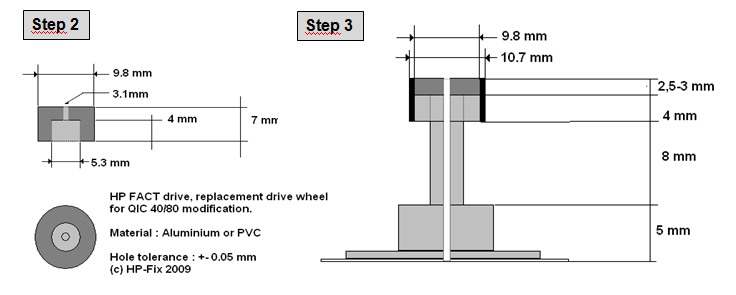
Steps 2 & 3: Add Modified Capstan Drive Wheel (Courtesy Rik Bos)
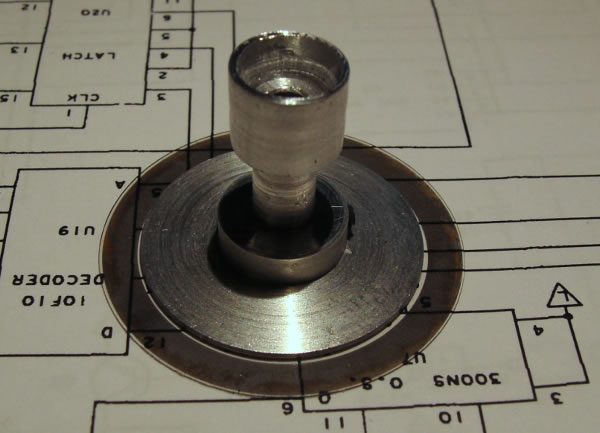
Modified Capstan, Still Missing the Grip Coating (Courtesy Rik Bos)
Due to the different magnetic characteristics of the quater inch tape, you also have to adjust the tape write head current by replace a resistor on the tape drive PCB to one with aprox. 160-170 ohms:
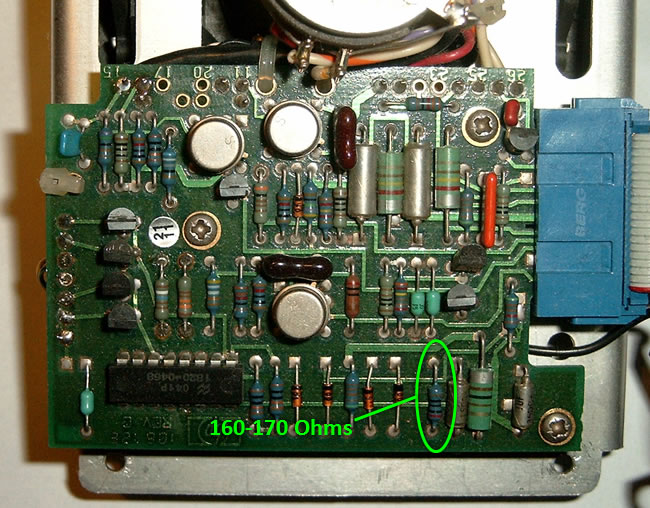
Step 4: Exchange the Resistor
Well, apart from that I don't own a lathe, I never tried this mod on my own. But Rik swears it works fine on his HP-85 and (with some problems in recognizing the EOT marker and thereby unspooling the tape...) also in his 9835B. As a matter of fact, the QIC minicartridge is a bit too thick and hardly fits for the tape-in slot of the 9845, so probably the mod will be limited to the 9835 and HP-85 systems.